Are you curious about adding subtle animations to your website? Wondering if there are practical uses for them? Not sure if you know enough about CSS and JavaScript to pull it off? Then this beginner web design tutorial is for you.
Why add animations to your website?
Since the human eye is attracted to motion, animations can be the perfect tool to draw attention to specific parts of a web page. They can provide visual clues, giving visitors hints about actions you’d like them to take. You can also add subtle effects to elements such as logos, icons and buttons or create visual storytelling elements with parallax scrolling.
But, animations in the wrong place or at the wrong speed can also annoy users and distract them from their goal. Too many JavaScript animations can also slow page load times. There is such a thing as “too much of a good thing.” So keep them subtle and add them sparingly.
How do you add subtle animations to a web page?
First things first. Lets talk about file linking. Most likely, you will link a web page to a separate CSS file and/or a separate Javascript (JS) file. There are many tutorials where you can copy the CODE and paste the CSS into a .css file and JavaScript into a .js file and then link your web page to those files. You don’t necessarily have to understand the code completely. But you do have to link the files correctly. It can be frustrating to read through a whole tutorial, follow the steps and then end up with an animation that just doesn’t work. (NOTE: It could also be your web browser. Be sure to check more than one.)
What about Page Speed?
Before you go ahead and add CSS and Javascript files to your website, you’ll also want to keep CSS and Javascript optimization in the back of your mind. The more files you link to and the larger those files are, particularly Javascript files, the slower your web page will be. But there are ways to combine CSS files, combine JS files, minify them and link to them in efficient ways.
READ: How to Optimize CSS and JS for Faster Sites.
Should you use CSS or JavaScript?
![]() In the past, CSS was only used to change simple properties of elements in a web page such as color and size. But now that CSS3 has come along, we can utilize CSS transitions and animations in fun and practical ways.
In the past, CSS was only used to change simple properties of elements in a web page such as color and size. But now that CSS3 has come along, we can utilize CSS transitions and animations in fun and practical ways.
You can add animated effects to icons such as “thumbs up” buttons or use them to show users the progress of an action they just took.
The CSS3 Animation Cheat Sheet is a great resource with a set of plug-and-play animations. You can add the CSS style sheet to your website and apply the premade CSS rules to the HTML elements you want animated.
CSS Animations versus Javascript Animations
![]() With CSS3, you can do simple animations without any JavaScript at all. They are fast and lightweight. JavaScript can be used to control those CSS animations and make them even better. JavaScript can handle things that CSS can’t such as when you need to stop, pause, slow down or reverse an animation. JavaScript often manipulates the CSS of your document in some way.
With CSS3, you can do simple animations without any JavaScript at all. They are fast and lightweight. JavaScript can be used to control those CSS animations and make them even better. JavaScript can handle things that CSS can’t such as when you need to stop, pause, slow down or reverse an animation. JavaScript often manipulates the CSS of your document in some way.
They can work together as a team.
Javascript is especially useful for scroll-based animations where content sections gradually appear as a visitor scrolls down a web page. CSS animations will automatically start without you doing anything, but if you want to wait until the visitor SCROLLS DOWN a web page and reaches a certain section, you will need to add some JavaScript. A JavaScript component like ScrollReveal.js can be applied to specific containers on a web page so only those elements animate.
The Nitty-Gritty Details of CSS Animations
You can add a CSS style sheet to your website, link to that stylesheet and apply a CSS rule to the HTML elements you want animated.
But how?
You must first understand HTML elements and CSS rules.
Already comfortable with HTML elements and CSS rules?
Skip ahead to PART II: Beginning CSS3 Animations.
HTML Elements in a Nutshell
Examples of HTML elements: div, h1, p
Examples of elements as tags: <div>, <h1>, <p>
An element becomes a tag when we use the angle brackets around it.
The <div> tag is a container unit that often surrounds other page elements and divides the HTML document into sections. Web designers can apply CSS styles to <div> elements. You can animate a <div> and make it fade in or move into the page from the left or right. You can do the same things with a <p> (paragraph).
But, you do not want to have ALL of your <div> and <p> elements fade in. Let’s just choose one. We’ll give it a class called .fadeInRight to make it special.
In our HTML document, we will write: <div class=”fadeInRight”>

NOTE: The class attribute specifies a class name for an element. The class attribute is mostly used to point to a class in a CSS style sheet. It can also be used by a JavaScript to make changes to HTML elements with a specified class.
In our CSS style sheet, we will write:
.fadeInRight {
...you can insert code here to animate this div...
}
(Now only the <div> element you gave the class .fadeInRight will be animated.)
Next, we will connect our HTML file to our CSS style sheet with a <link> tag in the <head> section of the web page.

EXAMPLES:
#1: <link rel=”stylesheet” type=”text/css” href=”style.css“>
#2: <link rel=”stylesheet” type=”text/css” href=”css/style.css“>
In the first example, our CSS style sheet is called “style.css” and is placed at the same level in our file structure as our web page. In the second example, the css style sheet is placed in a folder called “css“.
CSS Style Sheets in a Nutshell
- A CSS style sheet has rules that apply to an HTML document.
- CSS files usually end with the .css extension.
- CSS documents contain nothing but CSS.
- Use a <link> tag in your HTML document to specify which CSS document will be used by the HTML page.
- The <link> tag only occurs in the <head> section of an HTML document.
- The <link> tag has an href attribute, which describes the location of the the CSS stylesheet.
CSS Rules in a Nutshell
You need to have a pretty good grasp of CSS rules in order to have a basic understanding of CSS animations. So let’s review them quickly.
- A CSS rule-set consists of a selector and a declaration block.
- IMPORTANT: The selector points to the HTML element you want to style.
Anatomy of a Rule
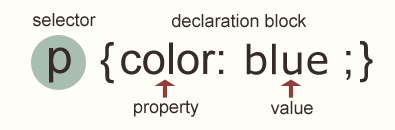
CSS rules have selectors and declarations.
REMINDER: The selector specifies what elements (in the related HTML document) are affected by the declaration. The selector in the example shown here is a “p.” (If a CSS style sheet with this CSS rule is linked to an HTML document, ALL the paragraphs in the HTML document will be blue.)
CSS Syntax

We can tidy up a style sheet by grouping declarations that relate to the same selector into a list (separated by semicolons).
div {border-width: 1px; border-style: solid; border-color: red;}
Sometimes, we can use SHORTHAND properties to simplify the code.

Let’s simplify our div.
div {border: 1px solid red;}
NOTE: You’ll see SHORTHAND properties used in CSS3 animations.
Let’s move on to PART II where we’ll see some DEMOS.
Return to Top