Part Two: A Closer Look at HTML Elements
We started adding some markup tags to our HTML5 page in Part One of this tutorial. This is what we have so far.
<html>
……………
</html>
 You are on your way to becoming familiar with these three related terms: Elements, Tags and Attributes.
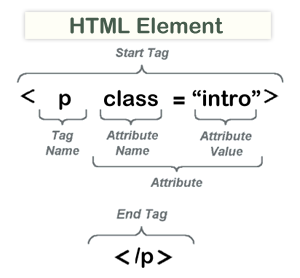
Let’s take a closer look at elements. Each element in an HTML5 document is named to represent what it does. Each tag in an element can have attributes. An attribute is placed inside the element’s opening (start) tag. Attributes define the characteristics of an HTML element. They may sound boring but they help HTML and CSS work together as a team.
Example: <p class=”intro”> …</p>
P is our Tag name.
Class is our Attribute name.
Intro is our Attribute value.
Back to Our HTML Document:
Change your opening <html> tag to <html lang=”en”> Lang is the attribute name in this instance. It describes the content language with a value of “en” meaning “english.”
So now our page looks like this:
<html lang=”en”>
……………
</html>
You will also need a pair of <head> and <body> tags in your document.
The head element
<head> … </head>
<head> is where you store things like the TITLE of your page, META TAGS, as well as LINK TAGS that connect to external CSS and Javascript files. For SEO (search engine optimization) purposes, you need title and meta tags included in the head section of your page.
The title element
<title> … </title>
<title>The History of Speed Skating</title>. The title doesn’t appear in a web page but does show in the bar across the top of the browser. It is important to search engines. Be sure to include it.
The meta element
<meta>
Meta elements also go in the head element.
- The charset meta tag:
<meta charset=”utf-8″> This tag tells the browser what type of letters the page is written in. - The description meta tag:
<meta name=”description” content=”This tag has information that is important to the search engines. It describes your page.“>.
The link element
<link>
Link – The link element is used to connect external files. Here, we will use the link tag to refer to an externally stored CSS style sheet named “style.css.” HTML5’s sidekick CSS3 keeps all of its code in the style sheet and the two documents can communicate, so to speak, if you use the link tag correctly in your HTML5 document.
<link rel=”stylesheet” href=”style.css”>
NOTE: Meta and link elements do not need closing tags. Elements like these are called Void Elements. Void elements aren’t designed to contain text or other elements. These are the most well-known void elements: link, meta,img, br and input.
Let’s see what we have so far:
<html lang=”en”>
<head>
<title>Page Title Goes Here</title>
<meta charset=”utf-8″>
<meta name=”description” content=”Describe your page here using sentences.”>
<link rel=”stylesheet” href=”style.css”>
</head>
<body>
……………
</body>
</html>
The body element
<body> … </body>
The body element contains the code that web browsers use to generate what you see on your computer screen. We will nest some common HTML elements inside our body element.
Return to Top