Part Six: Creating a Simple HTML5 Web Page.
This web page will be simpler than the one we started in our “Smooth Strides from HTML to HTML5” tutorial, but it has many of the same elements.
You can name your page “index.html” and save it in a simple text editor or you can use an HTML editor like Adobe Dreamweaver. Or else just follow along and study the HTML elements and CSS rules.
<html lang=”en”>
<head>
<title>The History of Figure Skating</title>
<meta charset=”utf-8″>
<meta name=”description” content=”What is figure skating? Figure skating is a sport in which ice skaters, singly or in pairs, perform freestyle movements of jumps, spins, and lifts in a graceful manner.”>
<link rel=”stylesheet” href=”style.css”>
<!–[if lt IE 9]>
<script src=”http://html5shiv.googlecode.com/svn/trunk/html5.js”></script>
<![endif]–>
</head>
<body>
<div id=”wrapper”>
<h1>The History of Figure Skating</h1>
<aside><p>Figure Skating is an official event in the Winter Olympics.</p>
<p><img src=”figure-skater.gif” alt=”figure skater” width=”200″ height=”375″></p></aside>
<p><span class=”special”>What is figure skating?</span> Figure skating, sport in which ice skaters, singly or in pairs, perform freestyle movements of jumps, spins, lifts, and footwork in a graceful manner.</p>
<p>Its name derives from the patterns skaters make on the ice, an element that was a major part of the sport until recently. There are various kinds of figure skating, including freestyle, pairs, ice dance, and synchronized team skating. </p>
<p>The founder of modern figure skating, as it is known today, was Jackson Haines, an American. Haines was known as the first skater to incorporate ballet and dance movements into his skating, as opposed to focusing on tracing patterns on the ice.</p>
<p> Haines also invented the sit spin and developed a shorter, curved blade for figure skating that allowed for easier turns. He was also the first to wear blades that were permanently attached to the boot.</p>
</div></body></html>
NOTE: The link element in the head section of the “index.html” page links the HTML5 document to the Cascading Style Sheet.
- The very first line: <!DOCTYPE html> makes it an HTML5 document.
- We will give our page a nice light blue background with a body attribute in our cascading style sheet that refers to our body element in our HTML page. We will also list the font we want to use for everything in our web page, which is “verdana.” We will write it in our cascading style sheet.
- We are adding one “div” element called “wrapper” to enclose all our information about figure skating. It starts out with <div id=”wrapper”> and ends down near the bottom of the page with </div>. We will give it a width and some margins in our cascading style sheet. We will give it margins of 20px on top and bottom and “auto” on the left and right side. This enables us to center it in the web browser. We’ve also given it a drop shadow.
- We have one heading element: h1 and many sets of p tags <p></p>. Inside our p tags, we have a lot of text. We will center our h1 element, but not our paragraphs. We will also give our h1 and p elements relative sizes in our cascading style sheet.
- We’ve added a span element inside one of our paragraphs and will give it the same color as our h1 element. We will also give it a font-weight: bold; declaration in our cascading style sheet so it stands out a little. Notice that a span element can go inside a p element in our HTML5 document, but a div element cannot.
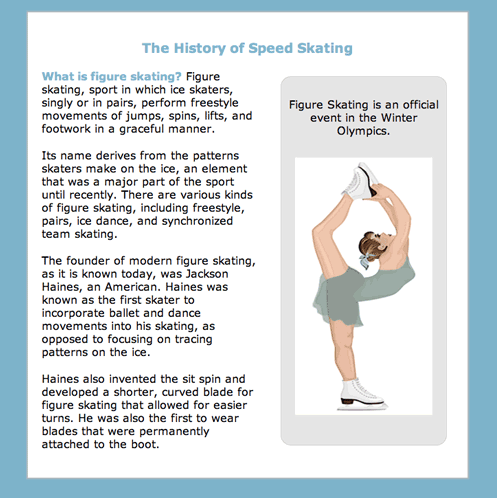
- We also have one image that we have included with the img element. It has no ending tag because it is a VOID element.
- We’ve also added one HTML5 semantic/structural element: aside. We are using it like a pull quote. It is not necessary in the flow of information and can be moved to the side of the page. We will float it to the right and give it a width with our cascading style sheet. We will also round the corners of it and be sure to add “display: block” to it as well.
Notice that we have included our image inside a paragraph inside our aside element. But you shouldn’t put a paragraph inside an image and you shouldn’t put the aside element inside our paragraph. We discussed block-level and inline-level elements in our “Smooth Strides from HTML to HTML5” tutorial.
Let’s create our cascading style sheet and name it “style.css” in a simple text editor.
body {background: #7db3ca; font-family: verdana, sans-serif;}
#wrapper {background: #fff; padding: 20px;
width: 600px; margin: 20px auto;
-moz-box-shadow: 0 0 2px 2px #bbb;
-webkit-box-shadow: 0 0 2px 2px #bbb;
box-shadow: 0 0 2px 2px #bbb;}
aside {display: block; width: 220px; float: right;
margin: 10px 10px 10px 30px; padding: 10px;
border-radius: 15px; background: #e5e5e5;
border: 1px solid #ccc; text-align: center;}
h1 {margin: 20px 0; color: #7db4cb; font-size: 1.2em; text-align: center;}
p {margin: 20px 0; font-size: 1em;}
span {color: #7db4cb; font-weight: bold;}
img {margin: 10px;}
Here is a smaller representation of the web page we have created. This is how most web browsers will interpret the code that we wrote for our HTML5 document and linked CSS3 style sheet.

Thanks to Webucator, a provider of customized web design training, for producing this video showing how we created this simple HTML5 page.
In Part Seven, we will review what we’ve learned and add an HTML5 and CSS3 “infographic” which will mention the main points of our discussion.

Return to Top