 If you’ve been thinking about converting your XHTML web pages to HTML5 web pages, your contact page may be the easiest place to start.
There are many new interesting features in HTML5 forms, such as new input types, new attributes and basic browser validation. Imagine client-side form validation without the need for JavaScript.
The first thing we need to do to create an HTML5 document is use the new doctype. Doctype is a lot simpler in HTML5 than XHTML. It’s also case insensitive.
<!DOCTYPE html>
Here is the basic structure of your web page without the contact form.
<html lang=”en”>
<head>
<meta charset=”utf-8″>
<title>Toddler Steps from XHTML to HTML5 – Contact Forms</title>
</head>
<body>
</body>
</html>
Some New HTML5 Elements and Tags to Learn.
- <header> The header tag is intended as a container for introductory information about a section or an entire webpage. If you’ve been using <div id=”header”> in your XHTML pages, that would be the tag to replace with <header>.
- <nav> Your navigation elements go here. Replace <div id=”navigation”> with <nav>.
- <footer> Replace <div id=”footer”> at the bottom of your page with <footer>.
There are many more new elements. But <header>,<nav> and <footer> are the easiest ones to start with.
<html lang=”en”>
<head>
<meta charset=”utf-8″>
<title>Toddler Steps from XHTML to HTML5 – Better Forms</title>
</head>
<body>
<div id=”wrapper”>
<header>
<nav></nav>
</header>
<form>Your Contact Form will go here.</form>
<footer></footer>
</div>
</body>
</html>
Here are three easily confused HTML5 structural elements:
<div>, <section> and <article>
We won’t discuss them here.
To learn more about them, read: HTML5 structure—div, section & article.
Let’s move on…
Unfortunately, do to the lack of standardization between web browsers, the new HTML5 elements (tags) can be misunderstood. This happens most often in older versions of Internet Explorer.
HTML5Shiv Script
Simply embed this HTML5Shiv script in the <head> section of your markup to enable the use of the new elements (tags) for old Internet Explorer browsers:
<script src=”http://html5shiv.googlecode.com/svn/trunk/html5.js”></script>
<![endif]–>
HTML5Shiv is a JavaScript workaround to enable styling of HTML5 elements in versions of Internet Explorer prior to IE9.
Styling Your New HTML5 Tags
In most modern browsers, all you need to do is apply CSS styles to the new elements <header>, <nav> and <footer> as you normally would. But make sure to add the display:block; rule to the new elements to help old browsers understand them.
Add this to the head section of your web page:
footer,header,nav {
display: block;
}
</style>
Read this web design tutorial: Baby Steps from XHTML to HTML5 to learn more basic differences between XHTML and HTML5 web pages.
HTML5 Contact Forms
Input Tag Changes from XHTML to HTML5
Input tags are slightly different in HTML5 than in XHTML.
In XHTML, they are closed using the forward-slash character: <input />.
In HTML5, this tag has been simplified to just <input>.
Input Type Changes from XHTML to HTML5
 For many years, contact forms were comprised of just a few kinds of Input Types such as text boxes, radio buttons, text area boxes and submit buttons.
All of these Input Types still work in HTML5. But HTML5 adds some exciting new features. Try out some demo contact forms.
HTML5 Contact Form Demo:
New Input Types in HTML5
HTML5 defines over a dozen new input types that you can use in your forms. We will discuss one really useful one: Email. This form field renders the exact same way as any normal text field, but is more specific about what information needs to be entered by the web site visitor. This input field will be automatically validated when submitted by the web browsers that recognize it.
Not all major browsers support all the new input types. However, you can already start using them. If they are not supported, they will behave as regular text fields. HTML5 doesn’t dictate how web browsers should present these new input types or how they should show validation errors. Expect to see some differences between browsers.
NOTE ABOUT MOBILE BROWSERS: On the iPhone/iPad the different input types are associated with different on-screen keyboards, making it easier for people to complete your online forms. They display different keyboards for a text input type and an email input type. Because email addresses always include an at-sign (@) and period, those are more prominent on the email type field keyboard. Triggering specialized keyboards such as these greatly enhances user experience and speeds up form completion for mobile users.
This image shows an example keyboard for the email input field.

Input Type: email
The email type is used for input fields that should contain an e-mail address.
E-mail: <input type=”email” name=”email” id=”email”>
Input Attributes
In addition to the new Input Types, HTML5 provides some handy new content attributes that can be used on input fields. HTML tags can contain one or more attributes. Attributes are added to a tag to provide the browser with more information about how the tag should appear or behave.
<input> attributes allow developers to achieve things that were previously only possible with JavaScript.
The “Placeholder” Attribute
One new HTML5 attribute is “Placeholder.” The Placeholder Attribute allows you to assign a value to a text field, which when selected, disappears and, if no text has been entered, will reappear again when de-selected.
The placeholder attribute is there to give the user an idea about how the data should be formatted. By default the placeholder text is displayed in light grey. This gives the impression that the text is temporary.
In this example, you see the words “numbers and hyphens allowed.”
<input type=”text” name=”phone” id=”phone” placeholder=”numbers and hyphens allowed”>

The HTML5 Placeholder attribute only applies to inputs with a type attribute value of text, email, search, tel, or url. It is reasonably well supported in the most recent browser releases. Browsers that don’t support the placeholder attribute will simply ignore it. The HTML5 Placeholder Attribute isn’t currently supported in Internet Explorer, but that should change when IE10 is released.
The “Required” Attribute
Another simple change you can make to your HTML5 contact form is to mark a text input field as ‘required’. The required attribute works with the following input types: text, search, url, tel, email, password, date pickers, number, checkbox, radio, and file. Adding the “required” attribute lets you specify that the user must enter a value before submitting the form.
It can be written like this:
<input type=”email” name=”email” required>
It can also be written this way:
<input type=”email” name=”email” required=”required”>
This informs the (HTML5-aware) web browser that the field is mandatory. Different browsers may display a warning or even prevent the form from being submitted if this field has no value. Be sure to assign a name attribute to your form elements or the required attribute will not take effect.
NOTE: By default visitors can’t see ‘required’ fields until they submit the form.
Styling HTML5 Forms with New CSS3 Pseudo-Classes
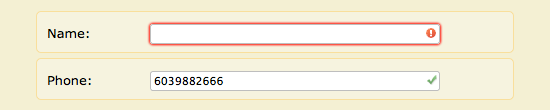
Use CSS to Show Form Field Validity As Visitors Start Typing.
With CSS, you can create your own valid/invalid place markers inside or alongside the input box, or simply use background colors and borders as some browsers do by default.
In this example, the exclamation point marker indicates that an required input is invalid. The Firefox browser also adds a red outline to the box. When the validation has passed, the background image will update to a green “check.” This helps the visitor fill in the form correctly.
CODE SNIPPET: Add this to the head section of your document. Then create your invalid and valid background images and place them in the same folder as your contact page.
<style type=”text/css”>
input:required:invalid {
background-image: url(invalid.png);
background-position: right;
background-repeat: no-repeat;
}input:required:valid {
background-image:url(valid.png);
background-position: right;
background-repeat: no-repeat;
}
</style>
Or you can change the background color of the input box:
<style-type=”text/css’>
input:required:invalid {
background-color: red;
}
input:required:valid {
background-color: white;
}
</style>
New input attributes like “Required” used in combination with “CSS Pseudo-Class Selectors ” make it easier to display feedback to the user. Visitors see the validity state of a form element as they are typing instead of having to wait until they submit the form.
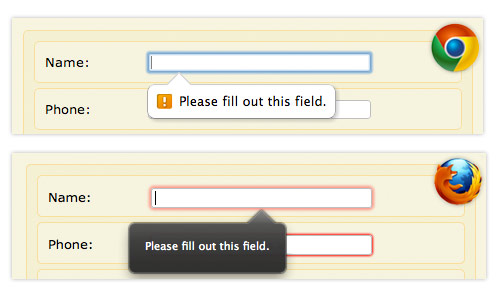
HTML5 Form Submission and the Cartoon Bubble
Right now, different browsers will do different things when a form using HTML5 elements is submitted. When there is an error, most browsers will prevent the HTML5 form from being submitted. They will instead display a “hint” to the user, marking the first field that is required and has no value with a “cartoon bubble” warning. Visual styling and support for these ‘bubble fields’ is quite broad.
Here are “cartoon bubble” warning examples from a Google Chrome web browser and a Firefox web browser.
Use CSS3 to Style your HTML5 Submit Button
Visitors click the submit button to process data after filling out a form. Using CSS properties such as background, border-radius, box-shadow and others, the button can be styled to make it stand out.
<input type=”submit” name=”submit” value=”submit”>
Read Style Web Forms Using CSS.
Example Contact Form Code
<label for=”name”>Name</label>
<input type=”text” name=”name” id=’name” required>
<label for=”phone”>Phone:</label>
<input type=”text” name=”phone” id=”phone” placeholder=”numbers and hyphens allowed”>
<label for=”email”>Email</label>
<input name=”email” id=”name” type=”email” required>
<label for=”comments”>Comments</label>
<textarea name=”comments” id=”comments” required></textarea>
<input type=”submit” name=”submit” id=”submit” value=”Submit”>
</form>
More Reasons to begin updating your Web Pages to HTML5.
- HTML5’s official release is expected in 2014.
- Facebook, YouTube, Google, Twitter and many other major web sites have already switched to HTML5.
- IE10 will soon be released. IE10 has made a giant leap in HTML5 support over version 9.
Processing HTML5 Forms
 Your HTML5 Contact Form will be stylish and easy for visitors to fill out but it won’t do anything useful without some means of processing it.
PHP is one of the most popular means of processing HTML forms. These web sites will show you how to process your contact form and send form results to your e-mail address.
Summary
You can take some easy “Toddler” steps from XHTML towards HTML5 today. Pick a web page with a simple layout such as a Contact Page and make a few updates in the source code.
- First change your web page’s Doctype.
- If you add any new HTML5 elements such as <footer>, don’t forget to include the display:block; rule in your CSS.
- To help old Internet Explorer web browsers, add the HTML5Shiv script.
- Try a new input type such as “email.”
- Add the “required” attribute and the“placeholder attribute” too… if you like.
- Then use CSS to style your required form elements, making it easier for visitors to fill out your form.
Be sure to try out your contact form yourself with different web browsers to see the exciting new changes. You’ll soon discover that you don’t need to be an HTML5 Expert to start using HTML5.
Return to Top
2 comments
Hi there. Really a step by step post for HTML5. Thanks for sharing it.
When I first saw this title Toddler Steps from XHTML to HTML5 – Contact Forms on google I just whent and bookmark it. After study a couple of of the weblog posts on your web site now, and I really like your way of blogging. I bookmarked it to my bookmark web site record and will probably be checking back soon. Pls check out my website as effectively and let me know what you think.