
In the old days, web designers performed cross-browser checks to make sure their web designs were compatible with various web browsers. These days, visitors no longer browse the web with just desktop computers. Now, web designers also have to adapt their designs to be readable on other devices such as smart phones.
It sounds like a daunting task but the basic concepts of mobile friendly web design are really quite simple for web designers who can code.
How do we make our websites mobile friendly?
Responsive Web Design is the most popular approach to creating mobile friendly websites.
Responsive Design is a way to develop websites where CSS is used to change the way a page renders on different display sizes. When accessing a site from a laptop or desktop computer, the visitor sees a full view of the website.
As the display size decreases for mobile or tablet, the page slims down and stacks the elements for easy viewing. This creates a user experience that works well across all devices. Implementing a basic Responsive Design in your new and existing websites isn’t as difficult as it sounds.
3 Key Elements to Bare-Bones Responsive Design
1) Start with the Meta Tag
Most mobile browsers scale HTML pages to a wide viewport width so the page fits on the screen. This means that a 960px wide website will shrink down to a teeny tiny size to fit into the device screen. But who can read that miniature website version without pinching and zooming with their fingertips?
The good news is that web designers can use the “viewport meta tag” to reset this. The “viewport tag” below tells the browser to use the device width as the viewport width and disable the initial scale.
Include this meta tag in the <head> section of your web pages:
2) Next Add Media Queries
CSS Media Queries are the other key element to responsive design. They let you write “conditions” to tell the browser how to render the page for a specified viewport width.
NOTE: You can write as many media queries as you like.
Default Page Styling
First Start with your default page styling. Keep in mind, there are various approaches to defining the default design. For example, you can choose to make the default design so that it is aimed at larger screens, including desktops and laptops, then target smaller screens with your media queries. Alternatively, you can take a “mobile-first” approach, with the default design aimed at small screens first. In this tutorial we take a desktop-first approach. Eventually, we will probably convert to the “mobile-first” approach as this seems to be the way to go.
Right now, though, it is important to note that Internet Explorer 8 and below don’t understand media queries. So, to implement the mobile-first approach (without adding any workarounds), visitors IE8 and below would see the teeny tiny screen of the mobile phone visitor.
Media Query Example Sizes:
@media only screen and (min-width: 769px) and (max-width: 959px) {
}
@media only screen and (min-width: 480px) and (max-width: 768px) {
}
You can add media queries to the cascading style sheet (CSS) that is linked to your web page. Add them at the bottom of your style sheet after you have styled the basic “default” layout for your web page. Notice that each media query’s instructions are contained between “braces” or “curly brackets.” { } These curly brackets are extremely important, so be sure that you don’t delete any of them by accident. If something suddenly goes terribly wrong with your code, look for a missing curly bracket.
In each media query, you will add specific styles inside the curly braces specific to the targeted screen size. If you have FLOATED elements in your “default” layout (with multiple columns), you will likely want to make those elements stack (with the sidebar displaying on top or below the main column) instead of side-by-side as you target the smaller screens. You will also change their width, so they spread out to fill the space.
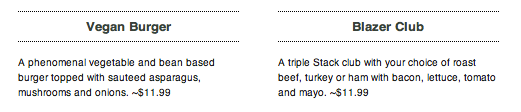
Menu Example with 2 Columns – FLOATS
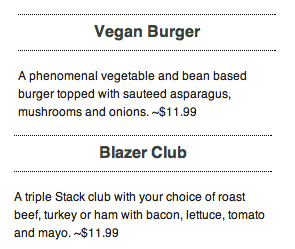
Menu Example with Stacked Columns – NO FLOATS
The great part about media queries is that you can define multiple queries in your style sheet. You can create a design layout for desktop computers, a new layout for tablets, and another one for mobile phones. Furthermore, modern DESKTOP browsers recognize media queries, so you can test your media queries on the fly at your desktop computer. Simply resize the browser window to see how your design responds to new size.
I have found it useful to add a “colored border” to the main container of my design in each of the media queries. Each one will be a different color so I can be sure which one I am looking at when I test the layout in my browser. These borders are later removed.
More Media Query Examples:
@media only screen and (min-width: 321px) and (max-width: 479px) {
#container {border: 1px solid red;}
}
@media only screen and (max-width: 320px) {
#container {border: 1px solid blue;}
}
3) Images
Images can become a problem when switching from a fixed-width to a responsive layout. An image file with a width and height will not scale as your design width decreases. Large images often end up sticking out beyond the edge of the smaller container.
The solution is a simple addition to your design’s style sheet:
Background images, on the other hand, can be targeted with your media queries.
Take Responsive Design for a Test Drive
Of course, responsive design can become quite complex when you get down to the nitty-gritty components of it. But, taking the first steps is not difficult and can actually be fun. Start with one of your simplest websites. Copy one of your web pages and create a DEMO page. Then copy your CSS style sheet to create a DEMO style sheet. Then link them together and play around with the code. And of course, TEST… TEST… TEST your new layout. You will soon be on your way to creating mobile-friendly websites.
Return to Top